The day is finally here!!--my blog entry on my baby boy's nursery project. The nesting bug bit hard and Pinterest exasperated the infection, so that many nights I found myself working on this project long after I should have been, speaking from a physical standpoint of aching hips, aching feet, and a few uninvited contractions. I just so badly wanted it to be done. Last week, most of it was finished, but Nick was working second shift and one final piece was missing, much to my dismay. The heavy shelf needed mounting above the changing table and I was under firm instructions not to attempt it myself. (Nick muttered something about hellfire so I took him seriously.) But Nick drafted Wes and Jared (both who must be loyal friends, because they delayed watching their beloved Birds' football game just to soothe the whims of a pregnant woman) and they did it this afternoon. God bless them.
Honestly, I think I've been so excited to post this because (a) I'm really happy with how the results turned out, (b) I have so many wow-look-what-God-did stories from this project that I'll share as I go below and (c) many parts of this room are things I did myself (with inspiration from Pinterest or other blogs!)
So it's done! What do you think?


The room we chose as a nursery had several challenges.
1. It's fairly small
2. There was no closet (just a stairwell for the attic
3. The floor was terribly scratched
But it also had several great features.
1. It was a good way to use the smallest room upstairs without sacrificing the remaining full-sized bedroom.
2. The bedroom stays nice and warm thanks to the radiator.
3. Plenty of charming, natural light.
Something great about this nursery: I didn't pay full price for a single thing in this nursery. I started to think about this several months ago and slowly accumulated things that found me. You'll see what I mean.
Project One: The Room and Paint
Inspiration: Pinterest
I have painted many many rooms. A love of color comes with my personality, I think, but this was a project that really stretched both my ability to trust my instincts and my strength to follow through. I am thankful for my mom's counsel during this project. Her energy to do the high painting, climb ladders, and forethought to use a chalk line to establish straight lines were key to this even being completed. Surprisingly, we completed the stripes part of this wall in less than two hours--it didn't take nearly as long as I feared. The spackling and base colors took much longer.
I used Sherwin Williams paint (SW7556 Creme, SW7685 White Raisin, and SW6214 Underseas) and measured the total height of the wall, dividing by seven (because that's the total number of stripes I wanted.). This gave me a stripe width of about 13 inches. I opted to use the light color against the baseboard and ceiling, which created a really great visual trick to make the ceilings seem even higher. We were concerned that the horizontal stripes would emphasize the smallness of the room, but I read on a Sherwin Williams blog that vertical stripes emphasize height, whereas horizontal stripes make a room seem larger.
I will tell you, I had a small heart attack when I originally put the colors on the wall. But when we pulled the tape, I fell in love. It was exactly the effect I had envisioned.
An extra feature: this room is versatile. Should our next baby be a girl, I simply change the slate blue accent wall to a plum and change to our white crib with my bedding from when Aly was born. presto!


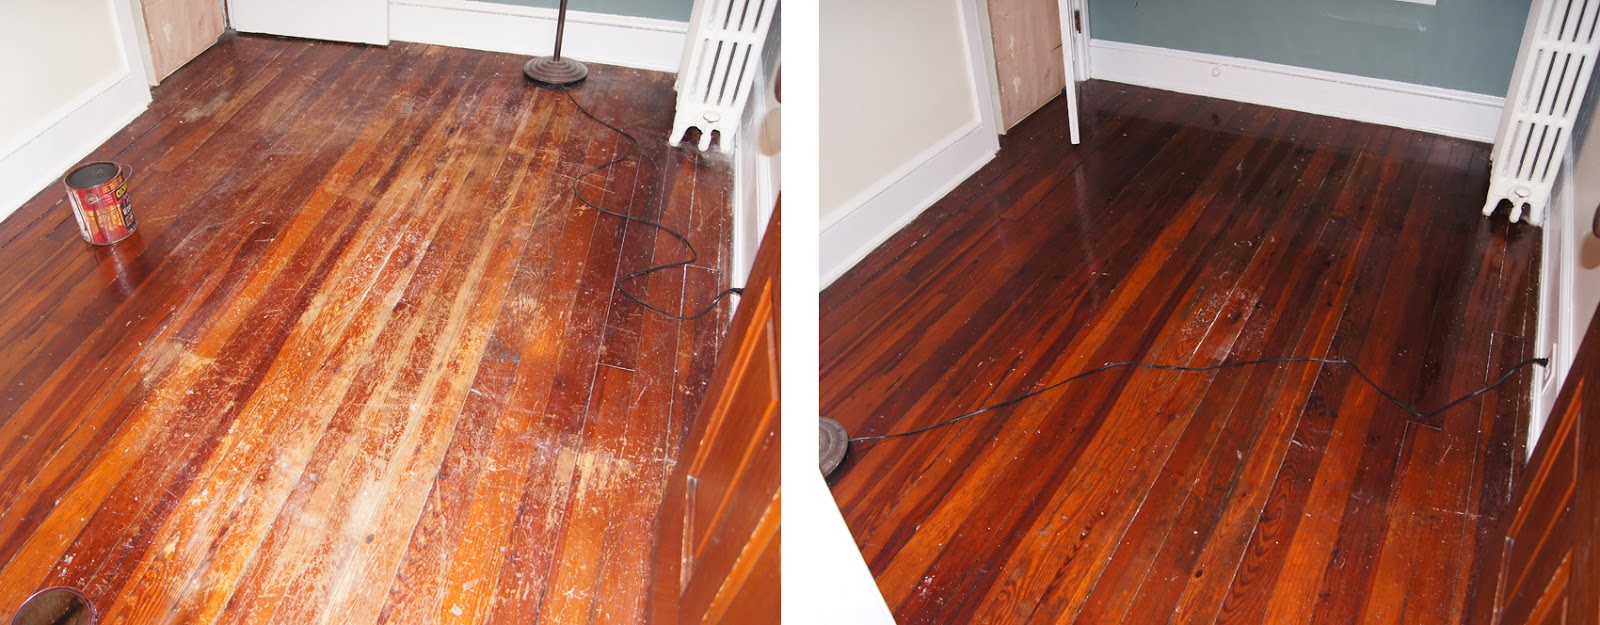
Project Two: The Floor
Inspiration: necessity :)
Frankly, I did not have the energy or desire to invest in refinishing this floor. That said, it was abysmal. Mom came up with the suggestion to soak a rag in stain and cover the roughest parts as best I could. So I did this, wiped up the extra stain, and then coated the whole floor in a Minwax floor touchup solution. It's not perfect, by far, but it is much much much better. Maybe next spring we can finish all the floors upstairs. Maybe.The rug was a God thing as well. Mom mentioned looking at Kohl's, because I had just gotten a 30% off coupon. I had just been planning to go to Ollie's but thought, eh, what can it hurt? Long story short, this rug was originally $99, on sale for $49.99, less 30% off. Sold. And perfect.

Project Three: The Crib
Inspiration: Pinterest (lots of entries on there about distressing furniture)
My sister-in-law, Emily, was generous enough to gift us this crib. She truly didn't need it and said I could refinish it any way I wanted, which of course I loved. The only thing: I dreaded sanding it down. I hate sanding. Hate It. But a friend, Jessie, mentioned a primer she used that didn't require sanding, so I used that gladly and found it created an excellent surface, ready to paint. I sanded off some old stickers, primed, painted with two coats of Sherwin Williams' Silver Mist semi-gloss. I also spray-painted the rusting metal braces and frames.
Finally, I attacked the beautiful finished surface with sand paper (both rough and smooth) to disturb the finish and make it look old again. I had actually bought glaze to make the crib look vintage, but found that this color, when tarnished with glaze, actually looked more dirty than old. I didn't like it. So I opted against the glazing/aging and just left it scuffed--which I think looks great!
Confession: it did take Nick and I about an hour to reassemble the crib. We put Aly to bed and spread all the pieces out on the floor--eventually our smarts outwitted the ancent wisdom of the old crib and we conquered.
I bought the bedding used on Ebay for $35. The skirt fits perfectly. I sewed the fitted sheet for about $10 from some fabric I found at Joann's. The bumper needs to be a little tweaked--it doesn't fit quite to my standards but that's a project I can handle as the belly gets more restrictive. The crib set also came with a quilt, but I found the fabric to be too worn for my tastes. So I opted against using it and ripped it apart, sewing an accent cushion for the glider from some of the remnants.


Project Four: Blinds and Roman Shade
Inspiration: Pinterest / Rachel Potteiger (here's a link)
I love Roman shades. But I hate the expense ($50+?) and knew that wasn't the route I wanted to go. When Rachel posted this on her blog several months ago, I stored it in the back of my brain as a possibility. And then one day, Steph (also preggo and as insane as I am) spent an hour in Joanns and I found this great fabric. Immediately I knew it would look awesome against the accent wall and would complement the paint.Mom helped me put this together. I bought an $11 roll-up blind to mount beneath the shade so my Roman shade could be almost entirely for aesthetics. This project uses a cheap miniblind (Walmart, $4) and about 2 yards of fabric, which I got on sale at Joann's for about $15 total. I love the results!


Project Five: Lamp and Shade
But Steph found a link (I'll get it if you want it) on how to cover a lampshade and even did one in her nursery, which was awesome because then she could walk me through it. I ended up running out of fabric so I had to get creative about finishing it. I used a remnant to create a gathered strip, which I adhered for an effect that I ultimately liked better anyways!
I taped the lamp carefully and spray-painted the metal a glossy gray color. I loved it! (the spray can shown though is just a prop--I actually used a shade from Valspar).
Thanks for blogging, Sheila!


Project Six: Burlap Monogram Canvas
Inspiration: Pinterest (link)
I found the 8x10 canvas at Michaels for 50% off (about $4) and the burlap on sale at Hobby Lobby (about $2). I bought acrylic paint in a buttercream color for about $2 and loved the results!
I found the 8x10 canvas at Michaels for 50% off (about $4) and the burlap on sale at Hobby Lobby (about $2). I bought acrylic paint in a buttercream color for about $2 and loved the results!


Project Seven: Closet
We just decided to make the stairwell for the attic function as a closet as well. We needed it to be functional, but bypassable when we wanted to take things up and down. We actually had these shelves in the basement from our old house! So Mom and I spackled, sanded and painted the stairwell, and Nick mounted the shelves. It turned out perfectly functional!
Project Seven: Name Caption Frames
Inspiration: Pinterest
Believe it or not, I found these frames on an entirely unrelated shopping trip at a thrift store several months ago. When I was down in the basement working on these other projects, the yellow color caught my eye and I thought, ahh! Perfect! I didn't touch the finish, other than to clean off a thick layer of dust. I created the inserts for them (the name has been blanked out with the magic of Photoshop until he arrives) and accidently broke the pane in the other, so this project is being corrected. But you get the gist. I opted for the dark red to add an accent color so everything wasn't so matchy-matchy.
I confess though, the more I look at that cracked glass, the more I like it. Hmmm.

Some other features:
 | |||
| Basket was $16 at Michaels. It was listed at 40%, which I was prepared for. But when I got up to the register, she rang it up at $0.01. One cent. I asked her and she said it was right. What a treat! I also stitched the changing pad cover. |
 |
| The bouncer we needed. Originally $120, but scored at a consignment sale for $15. |
 |
| My precious little distrac--I mean, assistant. :) |
2 comments:
I love this!!!!!!!!! Everything about this blog post is great. The room turned out amazing. You should be very proud of your efforts. :) I love all the details and the story of how the room came together. Yay for Pinterest also. :) You're awesome, Diane!
Quite impressive! I think This Old House would be proud!! : )
Post a Comment